Creating a Check Location UI in Flutter (For newbies)
1. Before you begin
This tutorial teaches you how to create the below UI in Flutter
Prerequisites
Basic knowledge of Flutter application development
Familiarity with using Android Studio to create Flutter projects
2. Create a project
Launch Android Studio to create a new project (You might need to close a current project before you can be able to do this). In the New Project panel,
Give the project the name locateme
Give the project the description: A reverse location search app
Select Java and Objective-C as languages
Deselect IOS, Linux, MacOS, Web and Windows as target platforms (Our focus is the Android platform)
Select Create project offline
3. Clear main.dart file
You only have one UI to create. In the UI is an app bar containing the text LocateMe. Also in the UI is a body containing a button Check Location positioned at its center
Where do you start? Start by going to the lib folder, opening the main.dart file and clearing the content of the file.
4. Create HomePage class
The UI you will be creating is known as a Homepage.
Before creating a Homepage from scratch, you need to decide on two things - Will the homepage widget be extending a stateless widget or it will be extending a stateful widget?
The homepage should extend a stateless widget if the only thing to be displayed on it is static information. Static information is information that doesn't change. They aren't expected to change whether based on user actions or based on some events. An example is when you are creating homepages to learn UI design. In many cases, you won't be adding interactions. It therefore wouldn't show you know what you are doing if you make the homepage extend a stateful widget.
The homepage associated with this UI should extend a stateless widget, but because this UI will be used in another tutorial, the homepage will extend a stateful widget. Now, it is extending a stateful widget because the information to be displayed on the homepage is dynamic. It is based on user action. The user will first be seeing a button on the homepage. But when the button is tapped, an address and a zip code are what should be on the homepage not the button. The information that will be on the homepage depends on user actions, which means the homepage must extend a stateful widget.
There are two components to creating a homepage that extends a stateful widget. The first is a HomePage class. The second is a _HomePageState class.
The first class should extend a stateful widget. The second class should extend a state widget.
Creating the HomePage class
Paste the below in the main.dart file:
class HomePage extends StatefulWidget {

}
*You should get the error: Classes can only extend other classes
The error is happening because the HomePage class is extending a class that is not yet recognized. To resolve the error, you need to import the Flutter material package. The StatefulWidget class is a class in the package. By importing the package, you make the class recognizable.
Add the below to the beginning of the main.dart file to import the package:
import 'package:flutter/material.dart';
Next, you will get another error: Missing concrete implementation of 'StatefulWidget.createState'.
To resolve the error, we need to implement a createState method.
One of the things about extending classes is that when you extend some classes, you will often need to implement abstract methods contained in those classes in the class you're creating to extend them.
Because you're extending the StatefulWidget class, you need to implement a method createState.
Add the below to the HomePage class to implement it:
@override State createState() => _HomePageState();
The code creates the method createState. The method returns a State object associated with the HomePage class. The syntax of the method uses an arrow function. Using an arrow function saves keystrokes. The method would traditionally have been created using the below:
@override State createState() {
    return _HomePageState();
}
But that would lead to you getting the warning: Don't put any logic in createState.
At this point, you will still be getting one error: The method '_HomePageState' isn't defined for the type 'HomePage'. Before you work to resolve it, you need to tackle the warning you're currently getting, that constructors for public widgets should have a named 'key' parameter. You're yet to create a constructor, that's why you're getting the warning.
Add the below, on top of the code creating the createState method to create the constructor:
const HomePage({super.key, required this.title});
You should get a message: 'title' isn't a field in the enclosing class.
Resolve it by adding the below on top of the constructor you just created:
final String title;
Now you will turn your attention to the error: The method '_HomePageState' isn't defined for the type 'HomePage'.
The error is appearing because you haven't created the _HomePageState class.
Before you create it, the below should be the codes in the main.dart file:
import 'package:flutter/material.dart';

class HomePage extends StatefulWidget {
  final String title;
  const HomePage({super.key, required this.title});
  @override State createState() => _HomePageState();
}
5. Create _MyHomePageState class
Add the below code to the main.dart file:
class _HomePageState extends State<HomePage> {

}
You should get the message: Missing concrete implementation of 'State.build'.
But at this point, the error in the HomePage class should have disappeared.
To implement the build method, add the below to the _HomePageState class:
@override Widget build(BuildContext context) {

}
You will still get the message: The body might complete normally, causing 'null' to be returned, but the return type, 'Widget', is a potentially non-nullable type.
But at least, you've gotten to a point you can start coding the actual UI.
6. Create the app bar
All you've been doing is writing boilerplate codes.
"You only have one UI to create. In the UI is an app bar containing the text LocateMe. Also in the UI is a body containing a button Check Location positioned at its center.
Next, you will code the first component in the UI - the app bar containing the text LocateMe.
Typically, in Flutter, the UI of an Android app is contained in a Scaffold widget.
To create the app bar, you will make the build method of the _HomePage state class to return a Scaffold object containing an app bar.
To achieve the lofty goal of creating things step by step, We will start by making the build method return an empty Scaffold object.
The below code achieves just that:
return Scaffold();
Now, the documentation for the Scaffold widget reveals that it has a property appBar. To create an app bar, all you need to do is assign an AppBar widget to that property.
The code would be modified to the below to achieve that:
return Scaffold( appBar: AppBar() );
As it stands, you've created an empty app bar.
Next, you will configure the app bar. You configure widgets via their properties. The AppBar has its properties. It's a good thing to dedicate some time to exploring each of the properties to see what kind of AppBar they create.
The first property you will manipulate is the backgroundColor property. The backgroundProperty is usually set to a color object. For the UI, you will be setting it to the inversePrimary color of the Flutter ColorScheme class. The below code achieves that:
backgroundColor: Theme.of(context).colorScheme.inversePrimary
The color is an accent color used for displaying a highlight color on inverseSurface backgrounds, like button text in a SnackBar
Other than the background color property, the other property you need to manipulate to create the app bar in the UI is the title property.
You will be setting its value to a Text widget containing the title of the app as text. But know that you can alternatively set its value to an Image widget.
The below code achieves that:
title: Text(widget.title)
What is the text widget in the code? Well, it refers to an instance of the enclosing widget class. That is an instance of the _HomePageState class.
The code widget.title accesses the value of the title property of the class.
_HomePageState doesn't have a title property. But HomePage does. The code accesses the value of the title property of the HomePage class.
At this point, you are done creating the app bar.
The below should be the codes in the main.dart file:
class HomePage extends StatefulWidget {
    final String title;
    const HomePage({super.key, required this.title});
    @override State createState() => _HomePageState();
}

class _HomePageState extends State<HomePage> {
    @override Widget build(BuildContext context) {
        return Scaffold(
                appBar: AppBar(
                          backgroundColor: Theme.of(context).colorScheme.inversePrimary,
                          title: Text(widget.title)
                        )
                );
    }
}
To test things, you will need to create two things in the main.dart file-
A main method.
A MyApp class.
The main method is the entry point to the app. The MyApp class is the object the main method will be running.
7. Create the MyApp class
Add the below code to the top of the main.dart file below the import statement:
class MyApp extends StatelessWidget {

}
You should get the message: Missing concrete implementation of 'StatelessWidget.build'.
Next, implement the build method with the below:
@override Widget build(BuildContext context) {

}
You will get two messages. The second is: Constructors for public widgets should have a named 'key' parameter.
This message is telling you to add a constructor.
Add the below to the class, on top of the build method:
const MyApp({super.key});
The first error in the MyApp class is: The body might complete normally, causing 'null' to be returned, but the return type, 'Widget', is a potentially non-nullable type.
The message is you should add code returning a widget in the build method.
The build method builds a widget. You are expected to make the method return the widget to be built.
The build method of the MyApp class usually builds a MaterialApp widget. We will therefore be making the method return a MaterialApp widget.
Add the below to the method:
return MaterialApp();
You can ignore the error you are getting: Use 'const' with the constructor to improve performance.
Next, you will configure the MaterialApp widget. For the UI, you only need to configure two properties: the theme property and the home property. The theme property is where you specify the theme of the app, the home property is where you specify the homepage widget. That is, which of the widgets you created do you want to appear as the homepage widget? Any widget can be made to be the homepage widget. It doesn't necessarily need to go by the name HomePage. It is in the home property you specify that.
For the theme property, you will assign a ThemeData widget to it.
Add the below code inside the MaterialApp constructor:
theme: ThemeData()
Next, you will configure the ThemeData object.
The first thing you will be configuring is the color. To do that, you have several options - configuring the primarySwatch property, configuring the colorScheme property, etc. You will take the option of configuring the colorScheme property.
Add the below code to the ThemeData constructor:
colorScheme: ColorScheme.fromSeed(seedColor: Colors.deepPurple)
The colorScheme parameter accepts a ColorScheme object that defines a specific color scheme for the app. In this case, ColorScheme.fromSeed(seedColor: Colors.deepPurple) creates a ColorScheme object based on the provided seedColor of Colors.deepPurple. The ColorScheme.fromSeed() method generates a color scheme based on the seed color by deriving various colors like primary, secondary, background, and others.
Add the below inside the ThemeData constructor:
useMaterial3: true
With that, you are done defining the app theme.
Next, you will specify the homepage widget. In this case, the HomePage widget.
Add the below in the MaterialApp constructor:
home: HomePage()
You should get the error: The named parameter 'title' is required, but there's no corresponding argument.
The error is appearing because the constructor of HomePage expects a title property to be initialized.
Add the below inside the constructor:
title: 'LocateMe'
You will still get the message: Use 'const' with the constructor to improve performance.
To fix it, precede the call to the HomePage constructor with the const keyword.
8. Create the main method
Add the below to the top of the main.dart file below the import statement:
void main() { runApp(const MyApp()); }
The code creates the main method. The entry point to the app. You can see all it is doing is running the MyApp class we created earlier.
The below should be the code in the main.dart file at this point:
import 'package:flutter/material.dart';

void main() { runApp(const MyApp()); }

class MyApp extends StatelessWidget {
    const MyApp({super.key});
    @override Widget build(BuildContext context) {
        return MaterialApp(
                theme: ThemeData(
                        colorScheme: ColorScheme.fromSeed(seedColor: Colors.deepPurple),
                        useMaterial3: true ),
                home: const HomePage(title: "LocateMe")
               );
    }
}

class HomePage extends StatefulWidget {
    final String title;
    const HomePage({super.key, required this.title});
    @override State createState() => _HomePageState();
}

class _HomePageState extends State<HomePage> {
    @override Widget build(BuildContext context) {
        return Scaffold(
                appBar: AppBar(
                            backgroundColor: Theme.of(context).colorScheme.inversePrimary,
                            title: Text(widget.title)
                        )
               );
    }
}
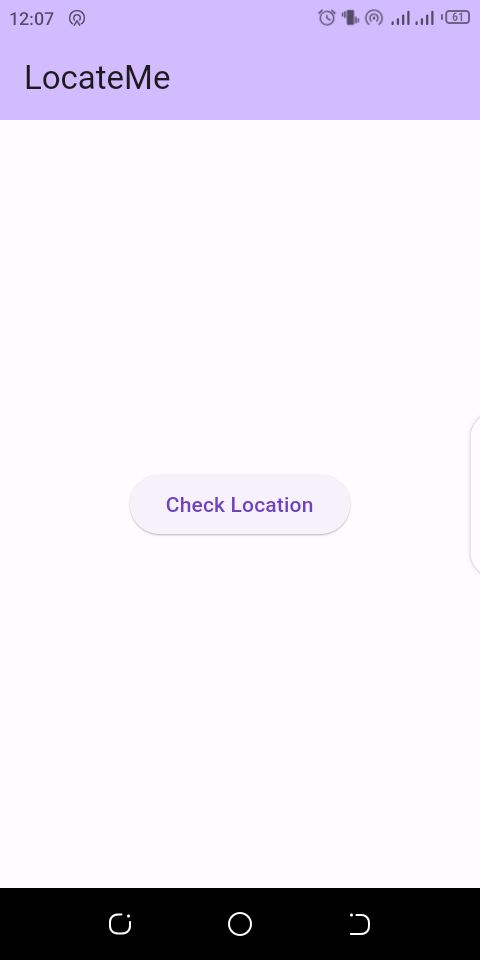
At this point, you can test the app. Use any suitable means to test the app - building a debug APK, using USB debugging, using WiFi.
The below UI should appear:
9. Create the Check Location button
Next, you will define the button that should appear in the center of the homepage.
For this, you will be configuring the body property of the Scaffold object in the build method of the _HomePageState class. At the moment, all you configured is the appBar property.
To get what you want, you will start by adding the below to the constructor of the Scaffold widget:
body: Center()
You want a button to appear at the center of the body. You should therefore start by assigning a Center object to the body property.
Next, you will configure the child property of the Center widget. What should be the child of the Center widget? Well, the Button you want to appear at the center.
Add the below to the Center constructor:
child: ElevatedButton()
The ElevatedButton widget requires a child property and an onPressed property in its constructor.
What will be the child of the ElevatedButton widget? Well, the text Check Location
Add the below code to the constructor of the ElevatedButton:
child: const Text('Check Location')
Next, you will configure the onPressed attribute.
Add the below code to the constructor of the ElevatedButton:
onPressed: (){}
An empty function was assigned to the onPressed property. This is needed if you don't want to define behaviour for the LocateMe button yet, but you want to create it.
At this point, you've created the button. But it will not appear well. When you check it out, you will see a need for some padding.
To add paddings to the button, you will need to wrap the ElevatedButton widget in a Padding widget. This means you will modify the code such that a Padding widget will be the child of the Center widget, and then the ElevatedButton widget will now be the child of the Padding widget. You will then define the padding attribute of the Padding widget.
Modify the Center widget to become the below:
Center( child: Padding( child: ElevatedButton( onPressed: (){}, child: const Text('Check Location')))) );
Next, add the below to the Padding constructor:
padding: const EdgeInsets.all(20)
You've assigned a padding of 20 pixels to the ElevatedButton.
The code should precede the child attribute by the way.
With this, you are done coding the UI. The below should be the codes at this point:
import 'package:flutter/material.dart';

void main() { runApp(const MyApp()); }

class MyApp extends StatelessWidget {
    const MyApp({super.key});
    @override Widget build(BuildContext context) {
        return MaterialApp(
                theme: ThemeData(
                        colorScheme: ColorScheme.fromSeed(seedColor: Colors.deepPurple),
                        useMaterial3: true ),
                home: const HomePage(title: "LocateMe")
               );
    }
}

class HomePage extends StatefulWidget {
    final String title;
    const HomePage({super.key, required this.title});
    @override State createState() => _HomePageState();
}

class _HomePageState extends State<HomePage> {
    @override Widget build(BuildContext context) {
        return Scaffold(
                appBar: AppBar(
                         backgroundColor: Theme.of(context).colorScheme.inversePrimary,
                         title: Text(widget.title)
                        ),
                body: Center(
                        child: Padding(
                                padding: const EdgeInsets.all(20),
                                child: ElevatedButton(
                                        onPressed: (){},
                                        child: const Text('Check Location')
                                       )
                               )
                       )
               );
    }
}
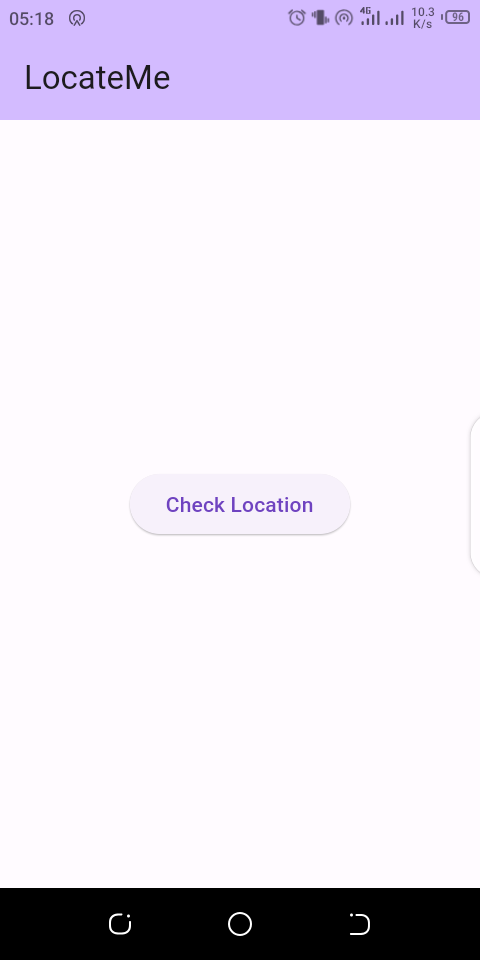
At this point, you can test the app. Use any suitable means to test the app - building a debug APK, using USB debugging, using WiFi.
The UI should appear as below:
Wrapping up
In this tutorial, you've been able to create a very simple UI in Flutter step by step.
Hopefully, when you're tasked with creating a similar UI, you won't struggle to write the codes.
If you think something is missing, have questions, or would like to offer any thoughts or suggestions, go ahead and leave a comment below.
I’d appreciate the feedback!


